
Time travelling is hard. Seriously.
After my experience, I've sworn off spinning through time and space. You may think it's all romance. A mysterious man in a fez and a glowing screwdriver grabs you by the hand and pulls you into a giant blue box and BAM you're in the 25th century. Or the 15th century. Or whatever. But my experience was not like this. Instead of the Doctor, I had a no-nonsense stewardess, and instead of the TARDIS, it was a 747. Sounds a lot like flying, eh? Well, yeah, it was. But use your imagination. When I took off, it was noon on January 1st. When I landed, it was 7am on January 1st. WHERE IS YOUR GOD NOW?
Well, really, it could be explained by time zones. And the rotation of the earth. Et cetera, et cetera. But that's no fun. Forget logic.
I learned this Christmas vacation that time travelling is not for me. Even if my form of "Time Travel" just involved passing through the International Date Line on the way back from Australia. If the Doctor offered me the companionship of a life time, I'd have to decline. It really screws with your head, man. Constantly not knowing what day (or year, or universe) would be tough. Your inner clock would be messed up hard core. I mean, do Time Lords even need to sleep?
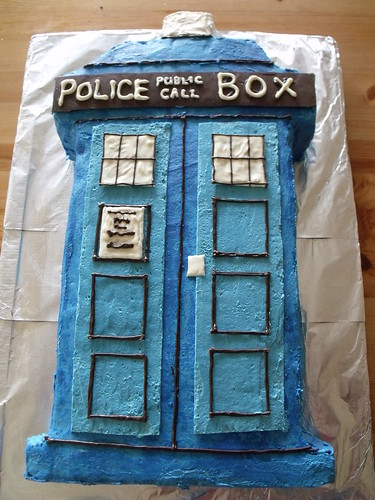
In order to celebration the Day of the Doctor (and time travellers in general), we whipped up this giant (and I mean GIANT) blue police call box (better known as the TARDIS) for Nerd HQ in our hometown of Burnaby. This thing was three blue velvet sheet cakes, eight cups of vanilla swiss buttercream, and a shit tonne of blue colouring gel. It was beloved by a whole gaggle of time lords, as well as a covey of companions.
Giant TARDIS Cake
Makes one giant TARDIS cake - feeds a large group of Time Lords
For the Cake - This is the recipe for only one of the sheet cakes. To make the Tardis, you will need three (aka three seperate batches of these). Better get baking!
Ingredients
2 1/2 cups AP flour
3 3/4 teaspoons baking powder
1 1/4 teaspoons salt
1 teaspoon baking soda
1 1/2 cups oil
1 1/2 cups white sugar
2 eggs
1 1/2 teaspoons vinegar
1 teaspoon vanilla
1 cup buttermilk
blue food colouring
1) Preheat your oven to 350F. In a large bowl, whisk together the flour, sugar, baking powder, salt, and baking soda. Make sure everything is thoroughly mixed together. In another small bowl, whisk together your oil, eggs, vinegar, and vanilla until everything is well incorporated.
2) Slowly pour your wet ingredients into your dry, stirring well with a wooden spoon. When everything has just begun to be incorporated, start slowly adding your buttermilk and a your blue food colouring. Continue to stir until your batter is without lumps.
3) Pour into a 9x13 cake plan (make sure it's lined with parchment paper) and bake for about 17-20 minutes, or until your cake tester comes out clean. Let cool completely. Now repeat until you have three full sheet cakes.
For the Frosting - this should give you enough to fill and frost the cake.
Ingredients
8 large egg whites
2 cups sugar
2 3/4 cups + 1 Tablespoon butter
1 Tablespoon + 1 teaspoon vanilla extract
blue food colouring gel
Chocolate and white chocolate melting wafers
1) Place egg whites and sugar in a double boiler. With the water simmering, whisk the whites until the sugar grains have all disintegrated.
2) Remove from heat and pour into a large bowl, careful not to drip any water into the eggs. With an electric mixer, beat the eggs until they form stiff, glossy peaks. Reduce the mixer speed, and slowly add the butter, one small cubed at a time. Mix until it seems like your mixture has begun to curdle (don't worry, it hasn't!) and then keep mixing until smooth. This will take quite a while, but don't give up!

Assembly
1) Use one sheet cake as the main part (the "box") and use the second to create the top and bottom lip. Frost this all with the white icing (including the sides), making sure that you have a good amount of filling on the top. Stack the third whole sheet cake on top of the box, then use the rest of the second cake to form the second layer of the top and bottom of your Tardis. Crumb coat the whole thing (don't worry, we're putting another layer on top of that. Use some extra white on the top "light" of the Tardis - that is the only thing that will not be blue.
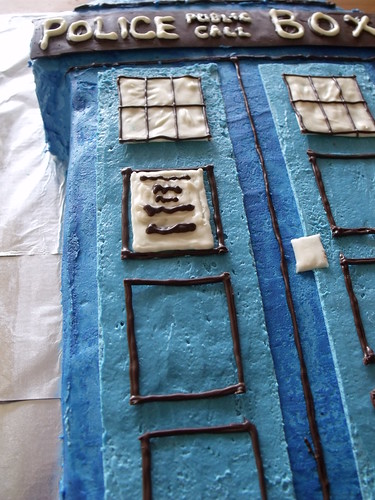
2) Set about a half cup of white icing aside, and colour the rest deep blue with your food colouring gel. Frost the whole thing with the blue, then stick it in the fridge (if you can find room) to harden slightly. Colour the rest of the white icing a lighter blue (for the front panels). Take out your cake and put strips of parchment paper where you do not want the light blue to show (check out our pictures for a helpful guide). Smear on a thin layer of the light blue icing on the top to make the panels, then pull off the parchment paper so you have a clean edge. Put it in the fridge to cool/harden.
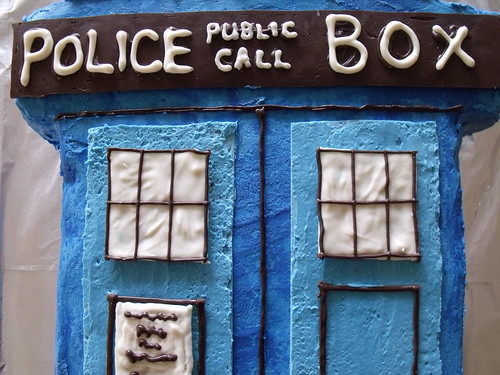
3) Use your melting chocolate to create accents, like the sign, the doors, and the "Police Call Box" top. Serve to your most favourite Doctor Who fans, and watch as everyone's tongues go blue.
The following pictures are from Nerd HQ patron, Stephen Gray - you can check out more of his neato photos on his Flickr page.


1 comment:
This article is very interesting. Dentist Clapham Junction
Post a Comment